> ## Documentation Index
> Fetch the complete documentation index at: https://docs.beam.ai/llms.txt
> Use this file to discover all available pages before exploring further.

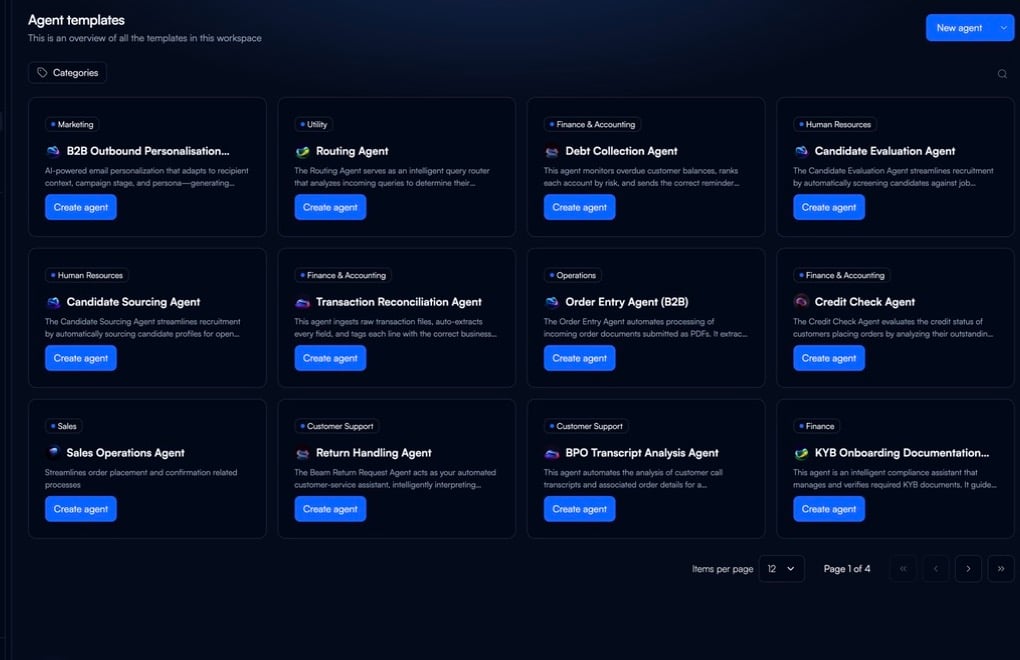
# Template Gallery

> Pre-built AI agent templates designed to automate business processes across various industries and departments

Jumpstart your automation with pre-built agent templates that solve specific business problems. Each template includes configured workflows, integration setups, and step-by-step setup instructions.

## Finance & Accounting

<CardGroup cols={2}>
  <Card title="Invoice Status Handling" icon="receipt">
    Automatically reconciles invoices and responds to supplier inquiries with real-time payment status updates.

    **Features**: Email detection, Airtable integration, automated status responses, complete audit trail

    **Industries**: Financial Services, Professional Services

    <Accordion title="Setup Instructions">
      <Steps>
        <Step title="Prerequisites">
          * Gmail account [service@beam.ai](mailto:service@beam.ai) connected with permissions to read and send emails
          * Airtable API access for invoice and payment status tracking
        </Step>

        <Step title="Create Agent">
          * Go to [Beam AI Templates](https://app.beam.ai/templates)
          * Click **Create** on the "Invoice Reconciliation Agent"
          * Click **Create** → **Continue**
        </Step>

        <Step title="Configure Trigger">
          * Service → Configure → Name & Description: "Invoice Reconciliation Agent"
          * Configure Frequency: On-demand or event-driven
          * Filter/Criteria: Process emails with subject containing "Invoice Reconciliation"
        </Step>

        <Step title="Deploy">
          Agent is now setup and ready to process invoice reconciliation emails
        </Step>
      </Steps>
    </Accordion>
  </Card>

  <Card title="Invoice Reconciliation" icon="arrows-left-right">
    Streamlines invoice reconciliation processes with automated transaction matching and notifications.

    **Features**: Airtable integration, transaction matching, automated notifications

    **Industries**: Financial Services, Professional Services

    <Accordion title="Setup Instructions">
      <Steps>
        <Step title="Prerequisites">
          * Airtable base with unmatched transactions table
          * Gmail account for notifications
        </Step>

        <Step title="Create Agent">
          * In Beam → Agent templates → **Invoice Reconciliation** → **Create → Continue**
        </Step>

        <Step title="Configure Settings">
          * Trigger: Manual (email trigger can be configured)
          * Integrations: Airtable (for transaction data), Gmail (for notifications)
        </Step>

        <Step title="Deploy">
          Agent is ready to reconcile transactions
        </Step>
      </Steps>
    </Accordion>
  </Card>

  <Card title="Order Entry Agent" icon="file-invoice">
    Automates order entry from PDF documents with duplicate detection and Airtable integration.

    **Features**: PDF processing, duplicate detection, Airtable integration, automated email notifications

    **Industries**: Finance Operations, E-commerce

    <Accordion title="Setup Instructions">
      <Steps>
        <Step title="Prerequisites">
          * Gmail account [service@beam.ai](mailto:service@beam.ai) for sending emails
          * Airtable integration with API keys and permissions
        </Step>

        <Step title="Create Agent">
          * Go to [Beam AI Templates](https://app.beam.ai/templates)
          * Click **Create** on the "Order Entry Agent"
          * Click **Create** → **Continue**
        </Step>

        <Step title="Configure Trigger">
          * Service → Configure → Name & Description: "Order Entry Agent"
          * Configure Frequency: On-demand (manual trigger or file upload)
          * Filter/Criteria: Process only new invoices with duplicate detection
        </Step>

        <Step title="Deploy">
          Agent is ready to process new order PDF documents
        </Step>
      </Steps>
    </Accordion>
  </Card>

  <Card title="Order Confirmation Agent" icon="circle-check">
    Generates order confirmations with Google Docs integration and database updates.

    **Features**: Google Docs generation, Airtable integration, approval workflow

    **Industries**: Finance Operations, E-commerce

    <Accordion title="Setup Instructions">
      <Steps>
        <Step title="Prerequisites">
          * Gmail account [service@beam.ai](mailto:service@beam.ai)
          * Google Docs integration enabled
          * Airtable integration for database updates
        </Step>

        <Step title="Create Agent">
          * Go to [Beam AI Templates](https://app.beam.ai/templates)
          * Click **Create** on the "Order Confirmation Agent"
          * Click **Create** → **Continue**
        </Step>

        <Step title="Configure Trigger">
          * Service → Configure → Name & Description: "Order Confirmation Agent"
          * Configure Frequency: On-demand (manual or automatic trigger)
          * Filter/Criteria: Order must be approved during workflow
        </Step>

        <Step title="Deploy">
          Agent is ready to generate order confirmations
        </Step>
      </Steps>
    </Accordion>
  </Card>

  <Card title="FNOL Handling Agent" icon="bell">
    Automates First Notice of Loss processing for insurance claims with intelligent routing.

    **Features**: Automated claim intake, risk assessment, routing optimization

    **Industries**: Insurance

    <Accordion title="Setup Instructions">
      <Steps>
        <Step title="Prerequisites">
          [service@beam.ai](mailto:service@beam.ai) account setup for integration
        </Step>

        <Step title="Create Agent">
          * Go to [Templates](https://app.beam.ai/templates)
          * Click Create on the "FNOL Handling Agent"
          * Click Create
        </Step>

        <Step title="Configure Trigger">
          * Agent Configurations → Click Triggers → Click "Add Triggers"
          * Triggers → Gmail
          * Configure → Name & Description = Gmail
          * Configure Frequency = Every Minute
          * Filter Dropdown = Subject, Criteria = FNOL Handling
          * Configure
        </Step>

        <Step title="Deploy">
          Agent is setup and ready
        </Step>
      </Steps>
    </Accordion>
  </Card>
</CardGroup>

## Human Resources & Recruitment

<CardGroup cols={2}>
  <Card title="Candidate Screening" icon="users">
    Automates initial candidate screening with resume analysis and qualification matching.

    **Features**: Resume parsing and analysis, qualification matching, automated scoring, Workable integration

    **Industries**: All Industries

    <Accordion title="Setup Instructions">
      <Steps>
        <Step title="Prerequisites">
          * Workable account connected to [service@beam.ai](mailto:service@beam.ai)
          * Access to job posts, candidates, and stage updates
          * Airtable access for job descriptions
        </Step>

        <Step title="Create Agent">
          * Go to [Beam AI Templates](https://app.beam.ai/templates)
          * Click **Create** on the "Candidate Screening Agent"
          * Click **Create → Continue**
        </Step>

        <Step title="Configure Trigger">
          * Service → Configure → Name & Description: "Candidate Screening Agent"
          * Configure Frequency: On-demand (manual start via "Create Task" or email trigger)
          * Filter/Criteria: Candidate must exist in Workable for selected job
        </Step>

        <Step title="Deploy">
          Agent is ready for candidate screening and evaluation
        </Step>
      </Steps>
    </Accordion>
  </Card>

  <Card title="Employee Documentation Collection" icon="clipboard">
    Streamlines new hire onboarding by automatically collecting and organizing required documents.

    **Features**: Document collection automation, compliance tracking, digital organization, Slack notifications

    **Industries**: All Industries

    <Accordion title="Setup Instructions">
      <Steps>
        <Step title="Prerequisites">
          [service@beam.ai](mailto:service@beam.ai) account setup for integration
        </Step>

        <Step title="Create Agent">
          * Go to [Templates](https://app.beam.ai/templates)
          * Click Create on the "Employee Documentation Collection Agent"
          * Click Create → Continue
        </Step>

        <Step title="Configure Trigger">
          * Triggers → Gmail
          * Configure → Name & Description = Gmail
          * Configure Frequency = Every Minute
          * Filter Dropdown = Subject, Criteria = Hiring Documentation
          * Configure
        </Step>

        <Step title="Deploy">
          Agent is setup and ready
        </Step>
      </Steps>
    </Accordion>
  </Card>
</CardGroup>

## Operations & Customer Service

<CardGroup cols={2}>
  <Card title="Customer Service Agent" icon="headset">
    Provides intelligent customer support with automated responses and knowledge base integration.

    **Features**: Automated response generation, knowledge base integration, PDF document upload

    **Industries**: All Industries

    <Accordion title="Setup Instructions">
      <Steps>
        <Step title="Prerequisites">
          [service@beam.ai](mailto:service@beam.ai) account setup for integration
        </Step>

        <Step title="Create Agent">
          * Go to [Templates](https://app.beam.ai/templates)
          * Click Create on the "Customer Service Agent"
          * Click Create → Continue → Continue
        </Step>

        <Step title="Upload Documents">
          Upload the following items into database and click continue:

          * Product Inquiry Extensive Products PDF
          * Techify Inc Product Return PDF
        </Step>

        <Step title="Configure Trigger">
          * Agent Settings → Triggers → Gmail → Configure
          * Name & Description = Gmail
          * Configure → Frequency = Every minute
          * Filter dropdown = Subject, Criteria = Customer Service Demo
          * Configure
        </Step>

        <Step title="Deploy">
          Agent is ready and setup properly
        </Step>
      </Steps>
    </Accordion>
  </Card>

  <Card title="Email Triage Agent" icon="envelope">
    Automatically categorizes and routes emails to appropriate departments or team members.

    **Features**: Email classification, automatic routing, priority assignment, label management

    **Industries**: All Industries

    <Accordion title="Setup Instructions">
      <Steps>
        <Step title="Prerequisites">
          * [service@beam.ai](mailto:service@beam.ai) account configured for integration
          * Ensure labels "Relevant" and "Not Relevant" exist in your mailbox
        </Step>

        <Step title="Create Agent">
          * Go to [Templates](https://app.beam.ai/templates)
          * Click **Create** on the "Email Triage Agent"
          * Click **Create → Continue → Continue**
        </Step>

        <Step title="Configure Trigger">
          * Triggers → Gmail
          * Configure → Name & Description = Gmail
          * Configure Frequency = Every Minute
          * Filter Dropdown = Subject, Criteria = Email Triage Demo
          * Configure
        </Step>

        <Step title="Deploy">
          Agent is setup and ready
        </Step>
      </Steps>
    </Accordion>
  </Card>

  <Card title="Data Extraction Agent" icon="file-text">
    Automatically extracts structured data from documents and forms for processing.

    **Features**: Document parsing, data extraction, format standardization

    **Industries**: All Industries

    <Accordion title="Setup Instructions">
      <Steps>
        <Step title="Prerequisites">
          [service@beam.ai](mailto:service@beam.ai) account setup for integration
        </Step>

        <Step title="Create Agent">
          * Go to [Templates](https://app.beam.ai/templates)
          * Click Create on the "Data Extraction Agent"
          * Click Create → Continue
        </Step>

        <Step title="Configure Trigger">
          * Triggers → Gmail
          * Configure → Name & Description = Gmail
          * Configure Frequency = Every Minute
          * Filter Dropdown = Subject, Criteria = "Data Extraction"
          * Configure
        </Step>

        <Step title="Deploy">
          Agent is setup and ready
        </Step>
      </Steps>
    </Accordion>
  </Card>

  <Card title="Insurance Claim Agent" icon="shield-check">
    Automates insurance claim processing with intelligent document handling and workflow management.

    **Features**: Claim intake automation, document processing, workflow routing

    **Industries**: Insurance, Customer Service

    <Accordion title="Setup Instructions">
      <Steps>
        <Step title="Prerequisites">
          [service@beam.ai](mailto:service@beam.ai) account setup for integration
        </Step>

        <Step title="Create Agent">
          * Go to [Templates](https://app.beam.ai/templates)
          * Click Create on the "Insurance Claim Agent"
          * Click Create → Continue
        </Step>

        <Step title="Configure Trigger">
          * Triggers → Gmail
          * Configure → Name & Description = Gmail
          * Configure Frequency = Every Minute
          * Filter Dropdown = Subject, Criteria = Claim Request
          * Configure
        </Step>

        <Step title="Deploy">
          Agent is setup and ready
        </Step>
      </Steps>
    </Accordion>
  </Card>
</CardGroup>

## Sales & Business Development

<CardGroup cols={2}>
  <Card title="Sales Operations Agent" icon="chart-line">
    Automates sales order processing with email triggers and workflow automation.

    **Features**: Email detection, order processing automation, Gmail integration

    **Industries**: Sales, Business Development

    <Accordion title="Setup Instructions">
      <Steps>
        <Step title="Prerequisites">
          [service@beam.ai](mailto:service@beam.ai) account setup for integration
        </Step>

        <Step title="Create Agent">
          * Go to [Templates](https://app.beam.ai/templates)
          * Click Create on the "Sales Operations Agent"
          * Click Create
        </Step>

        <Step title="Configure Trigger">
          * Agent Configurations → Click Triggers → Click "Add Triggers"
          * Triggers → Gmail
          * Configure → Name & Description = Gmail
          * Configure Frequency = Every Minute
          * Filter Dropdown = Subject, Criteria = order
          * Configure
        </Step>

        <Step title="Deploy">
          Agent is setup and ready
        </Step>
      </Steps>
    </Accordion>
  </Card>

  <Card title="Quotation Generation Agent" icon="file-invoice-dollar">
    Automates quotation generation from RFQ emails with template-based responses.

    **Features**: RFQ processing, automated quotation generation, email integration

    **Industries**: Sales, Business Development

    <Accordion title="Setup Instructions">
      <Steps>
        <Step title="Prerequisites">
          [service@beam.ai](mailto:service@beam.ai) account setup for integration
        </Step>

        <Step title="Create Agent">
          * Go to [Templates](https://app.beam.ai/templates)
          * Click Create on the "Quotation Generation Agent"
          * Click Create → Continue
        </Step>

        <Step title="Configure Trigger">
          * Triggers → Gmail
          * Configure → Name & Description = Gmail
          * Configure Frequency = Every Minute
          * Filter Dropdown = Subject, Criteria = RFQ
          * Configure
        </Step>

        <Step title="Deploy">
          Agent is setup and ready
        </Step>
      </Steps>
    </Accordion>
  </Card>
</CardGroup>

## Compliance & Verification

<CardGroup cols={2}>
  <Card title="KYC Verification" icon="check-circle">
    Automates Know Your Customer verification processes with document validation.

    **Features**: Document verification, identity validation, Airtable form processing

    **Industries**: Financial Services, Banking

    <Accordion title="Setup Instructions">
      <Steps>
        <Step title="Create Agent">
          * Go to [Templates](https://app.beam.ai/templates)
          * Click Create on the "KYC Agent"
          * Click Create → Continue
        </Step>

        <Step title="Configure">
          This agent primarily handles KYC verification workflows through Airtable forms. The main workflow involves processing form submissions for existing or new users.
        </Step>

        <Step title="Deploy">
          Agent is ready to process KYC verifications
        </Step>
      </Steps>
    </Accordion>
  </Card>
</CardGroup>

## Getting Started with Templates

<Steps>
  <Step title="Browse Templates">
    Explore templates organized by department and use case above. Each template includes a detailed description and setup instructions.
  </Step>

  <Step title="Check Prerequisites">
    Review the prerequisites for your chosen template. Most require [service@beam.ai](mailto:service@beam.ai) account access and specific integrations.
  </Step>

  <Step title="Create and Configure">
    Follow the setup instructions within each template card to create and configure your agent with the required integrations.
  </Step>

  <Step title="Deploy and Monitor">
    Deploy your agent and monitor performance through the Beam dashboard. All agents can be customized after deployment.
  </Step>
</Steps>

## Customization Options

All templates can be customized to fit your specific needs:

* Modify workflow logic and business rules
* Configure integrations with your existing systems
* Customize response templates and notifications
* Connect to your databases and APIs
* Set up custom analytics and reporting
* Adjust trigger frequencies and filters