> ## Documentation Index
> Fetch the complete documentation index at: https://docs.beam.ai/llms.txt
> Use this file to discover all available pages before exploring further.

# Creating Flows

> Design structured execution paths for AI agents with visual workflow builder, nodes, branches, and conditional logic

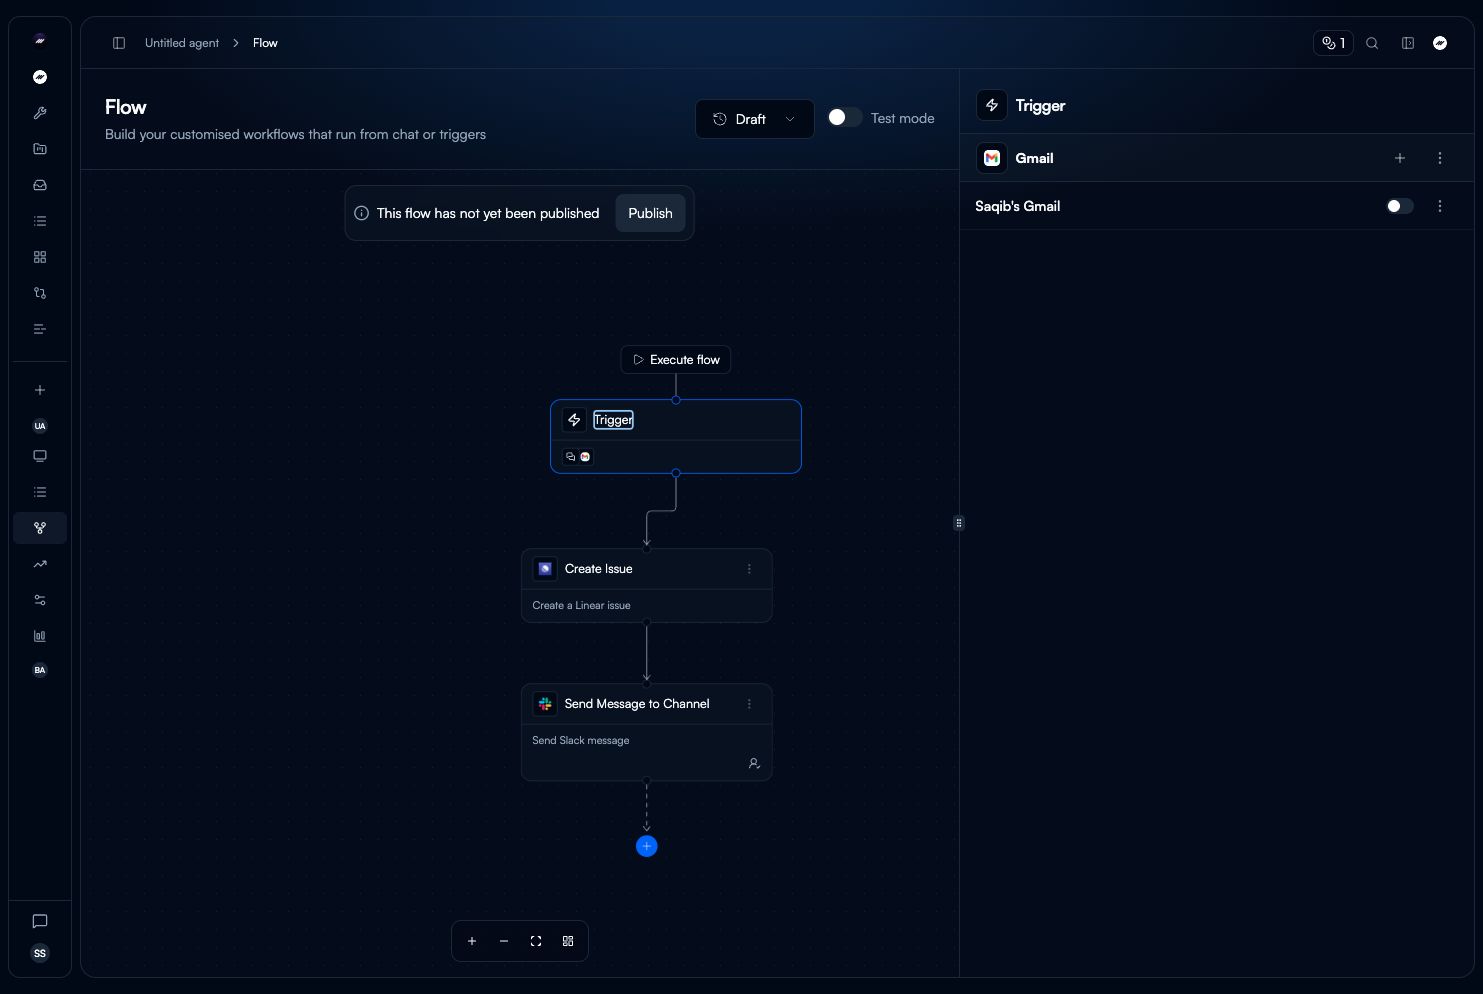
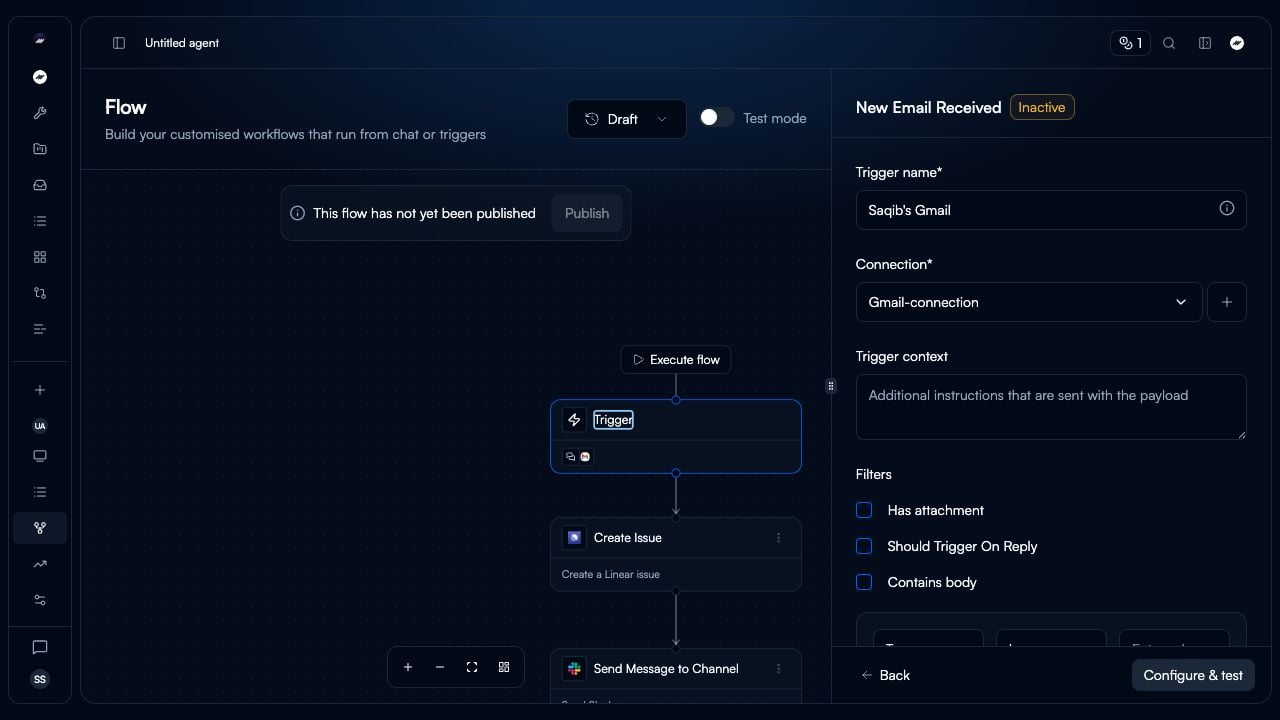
Flows define how your AI agent executes tasks through a graph-based structure of nodes, branches, and decision points. This enables intelligent automation that adapts dynamically to input data and real-time conditions.

<iframe src="https://app.supademo.com/embed/cmh2ij3te008h3ihye6h23e7y" frameborder="0" webkitallowfullscreen="true" mozallowfullscreen="true" allowfullscreen style={{width: "100%", height: "450px"}} />

## Understanding Flows

A **flow** is a graph-based structure that defines agent execution. It consists of:

<CardGroup cols={3}>
  <Card title="Nodes" icon="circle">
    Actions the agent performs using tools (AI processing, integrations, data operations)
  </Card>

  <Card title="Branches" icon="code-branch">
    Conditional paths with unique edge selection criteria determining the next node
  </Card>

  <Card title="Merging" icon="code-merge">
    Points where multiple branches converge back into a single execution path
  </Card>
</CardGroup>

## Building Flows: Step-by-Step

### Step 1: Creating Nodes

Every flow is built from **nodes**, and every node requires a **tool** to execute its action.

<Steps>
  <Step title="Add a Node">
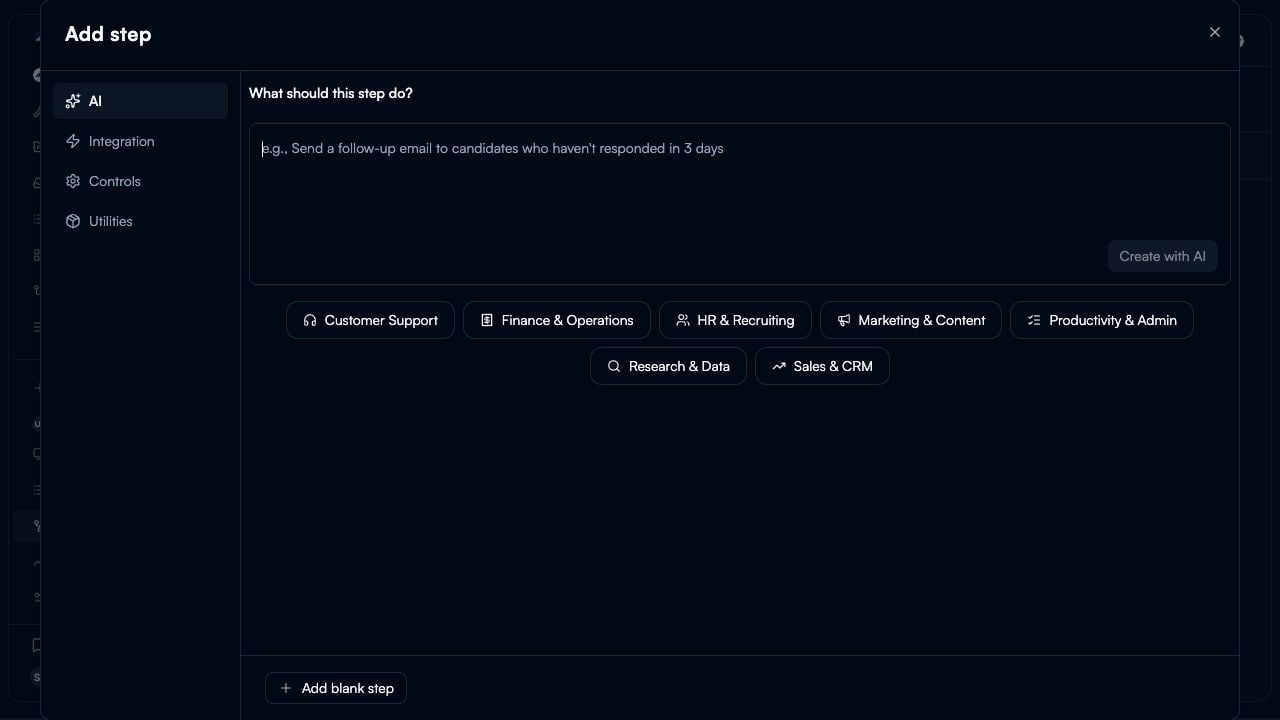
    Click the **+ icon** on the canvas to create a new node. You'll see options to:

    * **Insert a step**: Add a new node with a tool
    * **Add a branch**: Create conditional logic paths
    * **Add an exit**: Define workflow termination point

    Select **"Insert a step"** to add a new node.

    <Frame>
      <img src="https://mintcdn.com/beamai/_fu-3ODo4WjBAai0/02-building-agents/agent-fundamentals/flow-configuration/Screenshot%202025-11-03%20at%2023.51.02.png?fit=max&auto=format&n=_fu-3ODo4WjBAai0&q=85&s=ecd10029f6124477c5862898049cfc27" alt="" width="1190" height="968" data-path="02-building-agents/agent-fundamentals/flow-configuration/Screenshot 2025-11-03 at 23.51.02.png" />
    </Frame>
  </Step>

  <Step title="Define Node Objective">
    Add a clear **objective** describing what the node should accomplish

    **Example Objectives:**

    * "Extract customer email and order number from request"
    * "Send confirmation email to customer"
    * "Create new support ticket in Salesforce"
    * "Check if order exists in database"

    <Frame>
      <img src="https://mintcdn.com/beamai/_fu-3ODo4WjBAai0/02-building-agents/agent-fundamentals/creating-agents/Screenshot%202025-11-03%20at%2023.17.52.png?fit=max&auto=format&n=_fu-3ODo4WjBAai0&q=85&s=41b57a902466ee5eaed1ab43595b31db" alt="" width="2932" height="1568" data-path="02-building-agents/agent-fundamentals/creating-agents/Screenshot 2025-11-03 at 23.17.52.png" />
    </Frame>
  </Step>

  <Step title="Select the Tool">
    Choose ONE tool that defines what the node does:

    <Frame>
      <img src="https://mintlify.s3.us-west-1.amazonaws.com/beamai/02-building-agents/agent-fundamentals/flow-configuration/Screenshot%202025-11-06%20at%2021.31.40.png" alt="" />
    </Frame>

    **Option A: Match Tool**

    * Automatically pick the tool that fits your objective
    * System suggests best tool based on node description
    * Reuse tools across different agents

    **Option B: Generate Tool**

    * Let AI generate a new tool for you
    * Create new Custom GPT tool for AI-powered processing
    * Define prompt for classification, extraction, or analysis
    * Configure output schema

    **Option C: Choose Manually**

    * Browse and select a tool from the catalog
    * Browse 1500+ integration connectors
    * Choose actions like "Gmail - Send Email" or "Airtable - Create Record"
    * Connect external systems and platforms
  </Step>

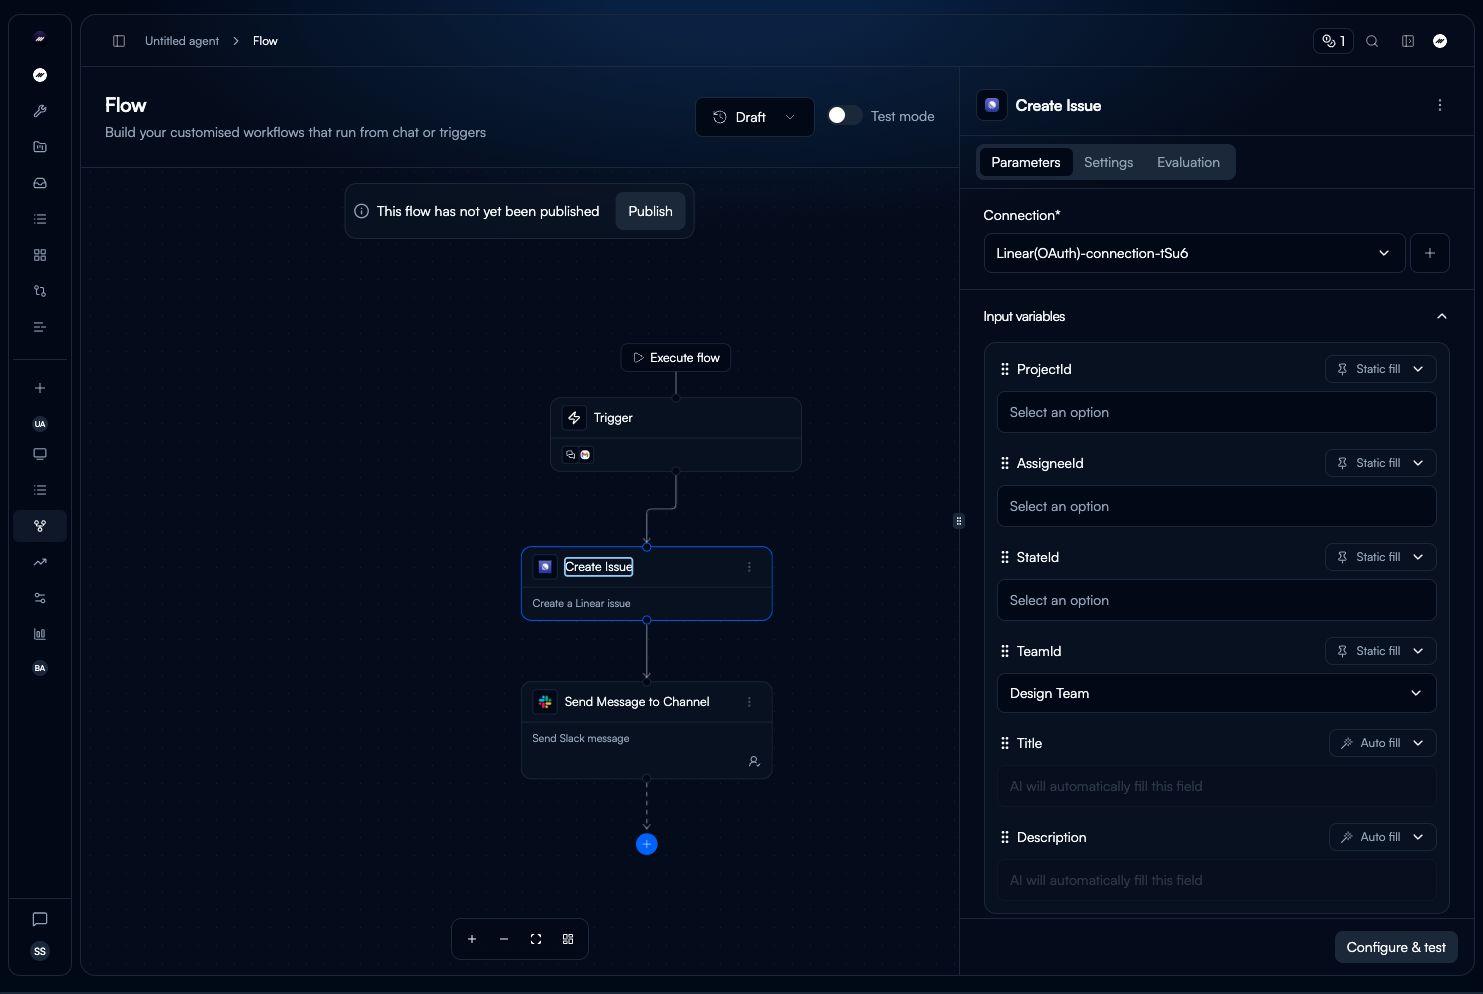
  <Step title="Configure Node Inputs">
    Map data to the tool's input parameters using variable fill methods:

    **Every node has access to:**

    * **`task_query`**: The trigger input that started the workflow (available to ALL nodes)
    * **Previous node outputs**: Via Linked variable fill method
    * **Memory context**: Historical data from past interactions via From Memory fill
    * **Static values**: Fixed configuration data defined in the workflow
    * **User inputs**: Values provided at runtime via User Fill method
    * **AI-extracted values**: Data extracted from context via AI Fill method

    **See [Variables & State](/02-building-agents/agent-fundamentals/variables-state/variables-state) for detailed variable fill configuration.**
  </Step>
</Steps>

**Understanding Tool Types:**

**1. Prompt-Based Tools (Custom GPT)**

* AI-powered processing using language models
* Classify, extract, or analyze data
* Generate structured outputs based on prompts
* Example: Email Classifier, Invoice Extractor, Sentiment Analyzer

**2. Integration Tools** (from catalog OR custom)

* **From Integration Catalog**: Pre-built connectors to 1500+ services (Gmail, Salesforce, Airtable, Slack, etc.)
* **Custom Integration**: Your own API connections for proprietary systems
* Execute actions like sending emails, creating records, retrieving data
* Handle data exchange with external systems

**See [Selecting Tools](/02-building-agents/agent-fundamentals/tools-integrations/tools-integrations) for comprehensive tool selection guidance.**

**See [Integration Connectors](/02-building-agents/agent-configuration/integration-connectors/integration-connectors) for detailed integration configuration guide.**

### Step 2: Adding Branches

**After every node, you can add branches** to create conditional logic and dynamic routing.

<Steps>
  <Step title="Add Branch to Node">
    1. Click on the node you want to branch from
    2. Select **"Add Branch"** or click the branch icon
    3. A new branch path appears from the node

    <Frame>
      <img src="https://mintcdn.com/beamai/_fu-3ODo4WjBAai0/02-building-agents/agent-fundamentals/flow-configuration/Screenshot%202025-11-03%20at%2023.51.02.png?fit=max&auto=format&n=_fu-3ODo4WjBAai0&q=85&s=ecd10029f6124477c5862898049cfc27" alt="" width="1190" height="968" data-path="02-building-agents/agent-fundamentals/flow-configuration/Screenshot 2025-11-03 at 23.51.02.png" />
    </Frame>
  </Step>

  <Step title="Define Edge Selection Criteria">
    **Each branch requires unique edge selection criteria** that determines when this path should be taken.

    **Edge Selection Criteria Types:**

    **Condition-Based:**

    * Data value comparisons (e.g., `priority == "high"`)
    * Boolean checks (e.g., `order_exists == true`)
    * String matching (e.g., `category contains "urgent"`)
    * Numeric ranges (e.g., `order_total > 1000`)

    **AI-Powered:**

    * Semantic classification (e.g., "Route to sales if inquiry is about purchasing")
    * Intent detection (e.g., "Branch to support if customer needs help")
    * Content analysis (e.g., "Take urgent path if sentiment is negative")

    **Example Configuration:**

    ```
    Branch 1 Edge Criteria: priority == "high"
    Branch 2 Edge Criteria: priority == "medium"
    Branch 3 Edge Criteria: priority == "low"
    ```

    <Frame>
      <img src="https://mintcdn.com/beamai/_fu-3ODo4WjBAai0/02-building-agents/agent-fundamentals/flow-configuration/Screenshot%202025-11-03%20at%2023.50.09.png?fit=max&auto=format&n=_fu-3ODo4WjBAai0&q=85&s=83cf517d520471ebbd5f576ef5405037" alt="" width="2360" height="1328" data-path="02-building-agents/agent-fundamentals/flow-configuration/Screenshot 2025-11-03 at 23.50.09.png" />
    </Frame>
  </Step>

  <Step title="Connect to Next Node">
    1. Each branch leads to a different next node
    2. Create new nodes or connect to existing ones
    3. Each path follows its own execution logic
    4. Branches can have different lengths and complexity
  </Step>

  <Step title="Add Multiple Branches">
    You can add multiple branches from the same node:

    * Each branch must have **unique edge selection criteria**
    * Criteria are evaluated in order
    * First matching branch is taken
    * Always include a fallback/default branch for unmatched cases
  </Step>
</Steps>

**Branch Types:**

**Conditional Paths:**

```
Classify Email Node →
├─ Branch 1: If category == "Sales" → Route to Sales Team
├─ Branch 2: If category == "Support" → Route to Support Team
└─ Branch 3: If category == "Billing" → Route to Billing Team
```

**Validation Branches:**

```
Check Order Exists Node →
├─ Branch 1: If order_found == true → Process Return
└─ Branch 2: If order_found == false → Request Order Number
```

**Priority Routing:**

```
Analyze Priority Node →
├─ Branch 1: If urgent == true → Immediate Processing
└─ Branch 2: If urgent == false → Standard Queue
```

### Step 3: Merging Branches

**Merging nodes** allow multiple branches to converge back into a single execution path.

<Frame>
  <img src="https://mintcdn.com/beamai/vR_W5YhQLI3StQGD/02-building-agents/agent-fundamentals/flow-configuration/Screenshot%202025-11-04%20at%2002.19.38.png?fit=max&auto=format&n=vR_W5YhQLI3StQGD&q=85&s=cfbef56f6994627e5b38e3a39534ec77" alt="" width="1674" height="1164" data-path="02-building-agents/agent-fundamentals/flow-configuration/Screenshot 2025-11-04 at 02.19.38.png" />
</Frame>

<Steps>
  <Step title="Identify Merge Point">
    Determine where parallel or conditional branches should rejoin:

    **When to Use Merging:**

    * After parallel processing that needs aggregation
    * Combining results from multiple conditional paths
    * Consolidating data from different sources
    * Rejoining branches before final output
  </Step>

  <Step title="Create Merge Node">
    1. Add a new node where branches should converge
    2. Connect multiple branch endpoints to this single node
    3. Each execution follows one branch path at a time
    4. Multiple executions can run simultaneously through different branches

    **Understanding Branch Execution:**

    * One execution = one branch path followed
    * Multiple task executions can happen at the same time
    * Each execution maintains its own state and data
    * Merging occurs when different execution paths need to converge
  </Step>

  <Step title="Configure Data Access">
    After branches converge at a merge node:

    * The node can access outputs from the branch path that led to it
    * Link variables from previous nodes in the execution path
    * Process data from the specific branch taken
    * Continue execution with the context from that path
  </Step>
</Steps>

**Merge Examples:**

**Parallel Data Gathering:**

```
Start Node →
├─ Branch A: Fetch Customer Data →
├─ Branch B: Fetch Order History  → Merge Node → Generate Report → End
└─ Branch C: Fetch Support Tickets →
```

**Conditional Paths Rejoining:**

```
Classification Node →
├─ Branch 1: If Urgent → Priority Processing →
└─ Branch 2: If Standard → Regular Processing  → Merge Node → Send Notification → End
```

**Multi-Source Data Consolidation:**

```
Data Request Node →
├─ Branch A: Query Database →
├─ Branch B: Call External API →
└─ Branch C: Retrieve from Cache → Merge Node → Validate Combined Data → Return Results
```

### Step 4: Setting Exit Conditions

Define when and how the workflow should stop execution.

<Frame>
  <img src="https://mintcdn.com/beamai/_fu-3ODo4WjBAai0/02-building-agents/agent-fundamentals/flow-configuration/Screenshot%202025-11-03%20at%2023.53.11.png?fit=max&auto=format&n=_fu-3ODo4WjBAai0&q=85&s=6b2503304572f6b53b160618e2d2425a" alt="" width="874" height="522" data-path="02-building-agents/agent-fundamentals/flow-configuration/Screenshot 2025-11-03 at 23.53.11.png" />
</Frame>

**Exit Points:**

* Flows end when they reach a node configured as an exit point
* You can have multiple exit points in one flow
* Each exit can return different output formats
* Configure output structure for each exit point

**Adding Exit Conditions:**

1. Add a node at any point in the flow
2. Mark it as an exit node
3. Configure the exit output schema
4. Connect from any node that should terminate there

**Common Exit Scenarios:**

* **Successful completion**: Task finished, return results
* **Manual review required**: Pause for human intervention
* **Error handling**: Graceful failure with error details
* **Early termination**: Conditions met, no further processing needed

## Next Steps

<CardGroup cols={2}>
  <Card title="Selecting Tools" icon="wrench" href="/02-building-agents/agent-fundamentals/tools-integrations/tools-integrations">
    Choose and configure tools for your nodes
  </Card>

  <Card title="Variables & State" icon="database" href="/02-building-agents/agent-configuration/variables-state/variables-state">
    Configure variable fill methods and data flow between nodes
  </Card>

  <Card title="Integration Connectors" icon="plug" href="/02-building-agents/agent-configuration/integration-connectors/integration-connectors">
    Configure external service connections and multi-connection patterns
  </Card>

  <Card title="Structured Outputs" icon="code" href="/02-building-agents/agent-configuration/structured-outputs/structured-outputs">
    Design JSON schemas for predictable tool outputs
  </Card>
</CardGroup>