> ## Documentation Index
> Fetch the complete documentation index at: https://docs.beam.ai/llms.txt
> Use this file to discover all available pages before exploring further.
# Triggers
> Configure the Trigger node that starts an agent Flow, then test it before publishing.
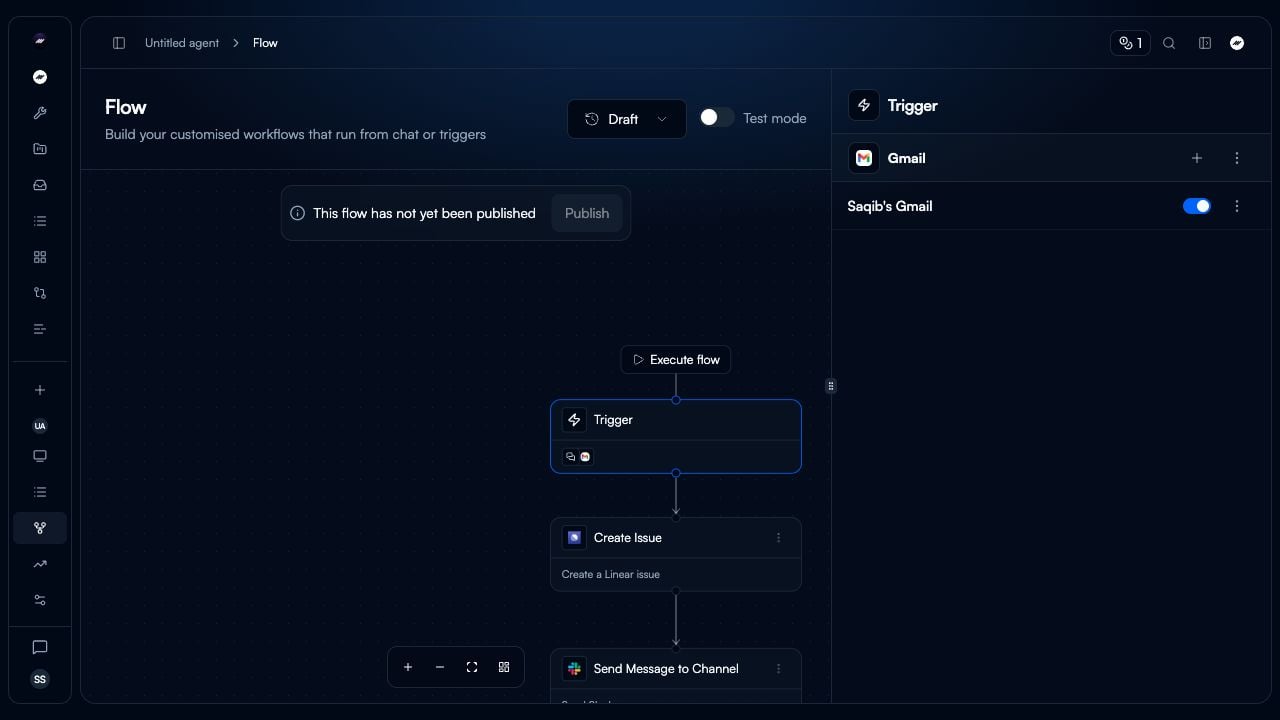
Triggers start an agent Flow. Configure them from the **Trigger** node in the Flow builder, not from a separate agent-configuration page.
Open the Trigger node
1. Open the agent's **Flow**.
2. Select the **Trigger** node at the start of the Flow.
3. In the sidebar, select the trigger provider and then the configured trigger card.
The Trigger sidebar groups triggers by provider. Use **Add trigger** to set the Flow's trigger; a Flow has one Trigger node rather than separate parallel triggers.
Selecting a Gmail **New Email Received** trigger opens its configuration in the Flow sidebar.
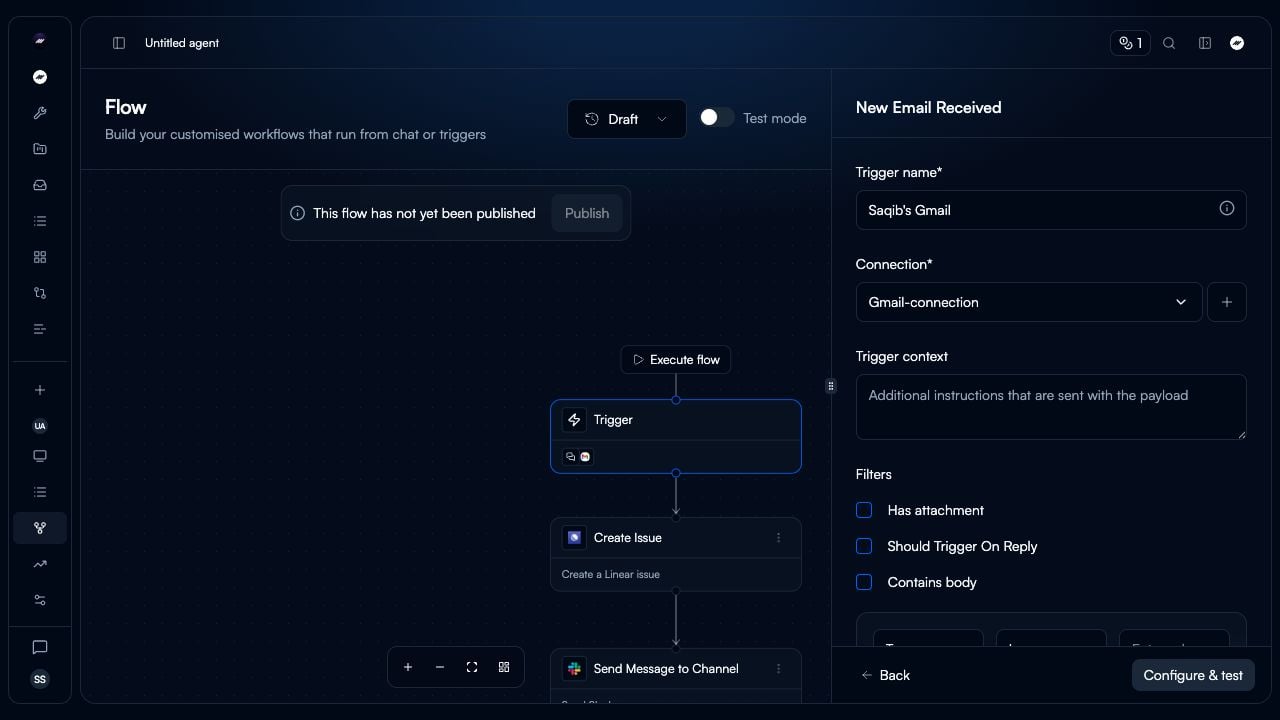 Configure these fields for the trigger:
| Field | Use it to |
| ------------------- | -------------------------------------------------------------------------------------------- |
| **Trigger name** | Give the trigger a recognizable name. |
| **Connection** | Choose the Gmail connection the trigger uses. |
| **Trigger context** | Add instructions that are sent with the trigger payload. |
| **Filters** | Narrow which messages start the Flow, including attachment, reply, and body-content filters. |
Use **Add condition** and **New Group** to refine the filters. Select **Configure & test** when the setup is ready to test.
Use a **Webhook** trigger when another system needs to start a Flow with an HTTP request.
1. Open the Flow's **Trigger** node and add or select the **Webhook** trigger.
2. Copy the webhook URL shown in the trigger configuration. Do not construct the URL by hand.
3. Send a JSON `POST` request to that URL.
The webhook endpoint uses this form:
```text theme={null}
https://api.beamstudio.ai/agent-tasks/{agentId}/webhook/{triggerId}
```
The request body follows the current task-session payload. Include the target `agentId` and a `taskQuery` object with its required `query` string. You can also provide URLs or Base64-encoded context files when the Flow needs them.
```json theme={null}
{
"agentId": "agent_123456",
"taskQuery": {
"query": "Process this customer inquiry"
},
"parsingUrls": ["https://example.com/customer-data"],
"encodedContextFiles": [
{
"data": "BASE64_ENCODED_CONTENT",
"mimeType": "application/pdf",
"fileName": "inquiry.pdf",
"fileSize": "2 MB"
}
]
}
```
Use the exact URL and trigger-specific requirements shown in the Flow UI. Webhook authentication controls are not documented here because their current configuration surface has not been verified.
Configure these fields for the trigger:
| Field | Use it to |
| ------------------- | -------------------------------------------------------------------------------------------- |
| **Trigger name** | Give the trigger a recognizable name. |
| **Connection** | Choose the Gmail connection the trigger uses. |
| **Trigger context** | Add instructions that are sent with the trigger payload. |
| **Filters** | Narrow which messages start the Flow, including attachment, reply, and body-content filters. |
Use **Add condition** and **New Group** to refine the filters. Select **Configure & test** when the setup is ready to test.
Use a **Webhook** trigger when another system needs to start a Flow with an HTTP request.
1. Open the Flow's **Trigger** node and add or select the **Webhook** trigger.
2. Copy the webhook URL shown in the trigger configuration. Do not construct the URL by hand.
3. Send a JSON `POST` request to that URL.
The webhook endpoint uses this form:
```text theme={null}
https://api.beamstudio.ai/agent-tasks/{agentId}/webhook/{triggerId}
```
The request body follows the current task-session payload. Include the target `agentId` and a `taskQuery` object with its required `query` string. You can also provide URLs or Base64-encoded context files when the Flow needs them.
```json theme={null}
{
"agentId": "agent_123456",
"taskQuery": {
"query": "Process this customer inquiry"
},
"parsingUrls": ["https://example.com/customer-data"],
"encodedContextFiles": [
{
"data": "BASE64_ENCODED_CONTENT",
"mimeType": "application/pdf",
"fileName": "inquiry.pdf",
"fileSize": "2 MB"
}
]
}
```
Use the exact URL and trigger-specific requirements shown in the Flow UI. Webhook authentication controls are not documented here because their current configuration surface has not been verified.
Test before publishing
Use **Execute trigger** to fetch trigger records and inspect their data before publishing the Flow. Use **Execute flow** when you want to test the complete Flow with a selected trigger record.
After reviewing the trigger and Flow results, publish from the Flow header.
Next steps
Add and configure the other nodes in an agent Flow.
Connect the services used by Flow nodes and triggers.
Review runs that start from a trigger.
Review publishing and Flow version history.